Tuesday 30 April 2013

Head and Neck Sculpt Part 1

Hello there! Next I'll be talking about... the hard part!

The head and neck sculpt for the main character of my film 'Mirror Image'
To start, I first took made an eye socket shape in silicone by originally sculpting it in Super Sculpey Firm and then making a plaster mould of it. I removed the sculpey from the mould and replaced it with silicone
(Which is what you see below)


I then sculpted the neck around the boy's armature to get a nice neck and shoulders for shrugging!


 Just like with the eye sockets, I made a plaster cast of the neck, using the same methods as my previous post on this blog (but a one part mould rather than two) I then replaced the Sculpey sculpted neck with silicone, waited for it to cure and there you have it (however the neck pictured was too pale for the skin colour needed (as I needed it to match the spray can I will be using on the faces.) So all I did was re-cast and the second neck was fine!


Now, to make the head, Firstly, I created another eye socket, but a solid one this time, as the silicone one didn't work too well, I then built up around the socket with balsa wood to give the head a light core (as apposed to a heavy sculpey head that would put more strain than necessary on my wire armature)


 I then roughed out the shape I needed for the boy's head. this needed not to have any detail, but just be a guide to make replaceable faces on op of, so above is the head in progress, and below is the head baked and sanded.


To make fancy replaceable faces, I borrowed some knowledge from the brilliant Flynn Twins, and their brilliant bloomin' blogs:
http://joshua-flynn.blogspot.co.uk  
and
http://nathan-flynn.blogspot.co.uk

 being inspired by both their blogs, I layered some vaseline on top of the pre sculpted head core and mixed some two part epoxy putty named 'Milliput'. This was then pressed on to of the vaseline to create a mask, that was then separated to create a replaceable brow and a replaceable mouth section.

I then waited for the milliput to harden (up to 3 hours, but I like to leave it a little longer) and then went on to sculpting the face and hair!


 On to of the Miliput mask, I applied even more sculpey and sculpted the boy's features in a neutral position. Shown above...


The eyes were created by creating a silicone mould of a bead and then pouring polyurethane fast cast resin into the mould to make an endless amount of eyes!
To get a nice clear pupil and therefore a better performance when animating, I decided to digitally paint a pupil, and then print them out on matte photo paper to the right size and stick them to the eye.
The front of the eye was sanded down with a dremel first to make a flat surface for the eyes to stick on to.

I came up with this method by myself, but it does have its disadvantages, such as on the side view the eyes can look quite flat and strange, and sometimes the light can catch the pupil and just be a massive shine, so when animating, I'll just have to make sure I angle no harsh light onto the face and position the puppet in a position that wont effect the eye

Shouldn't be too much of a problem!


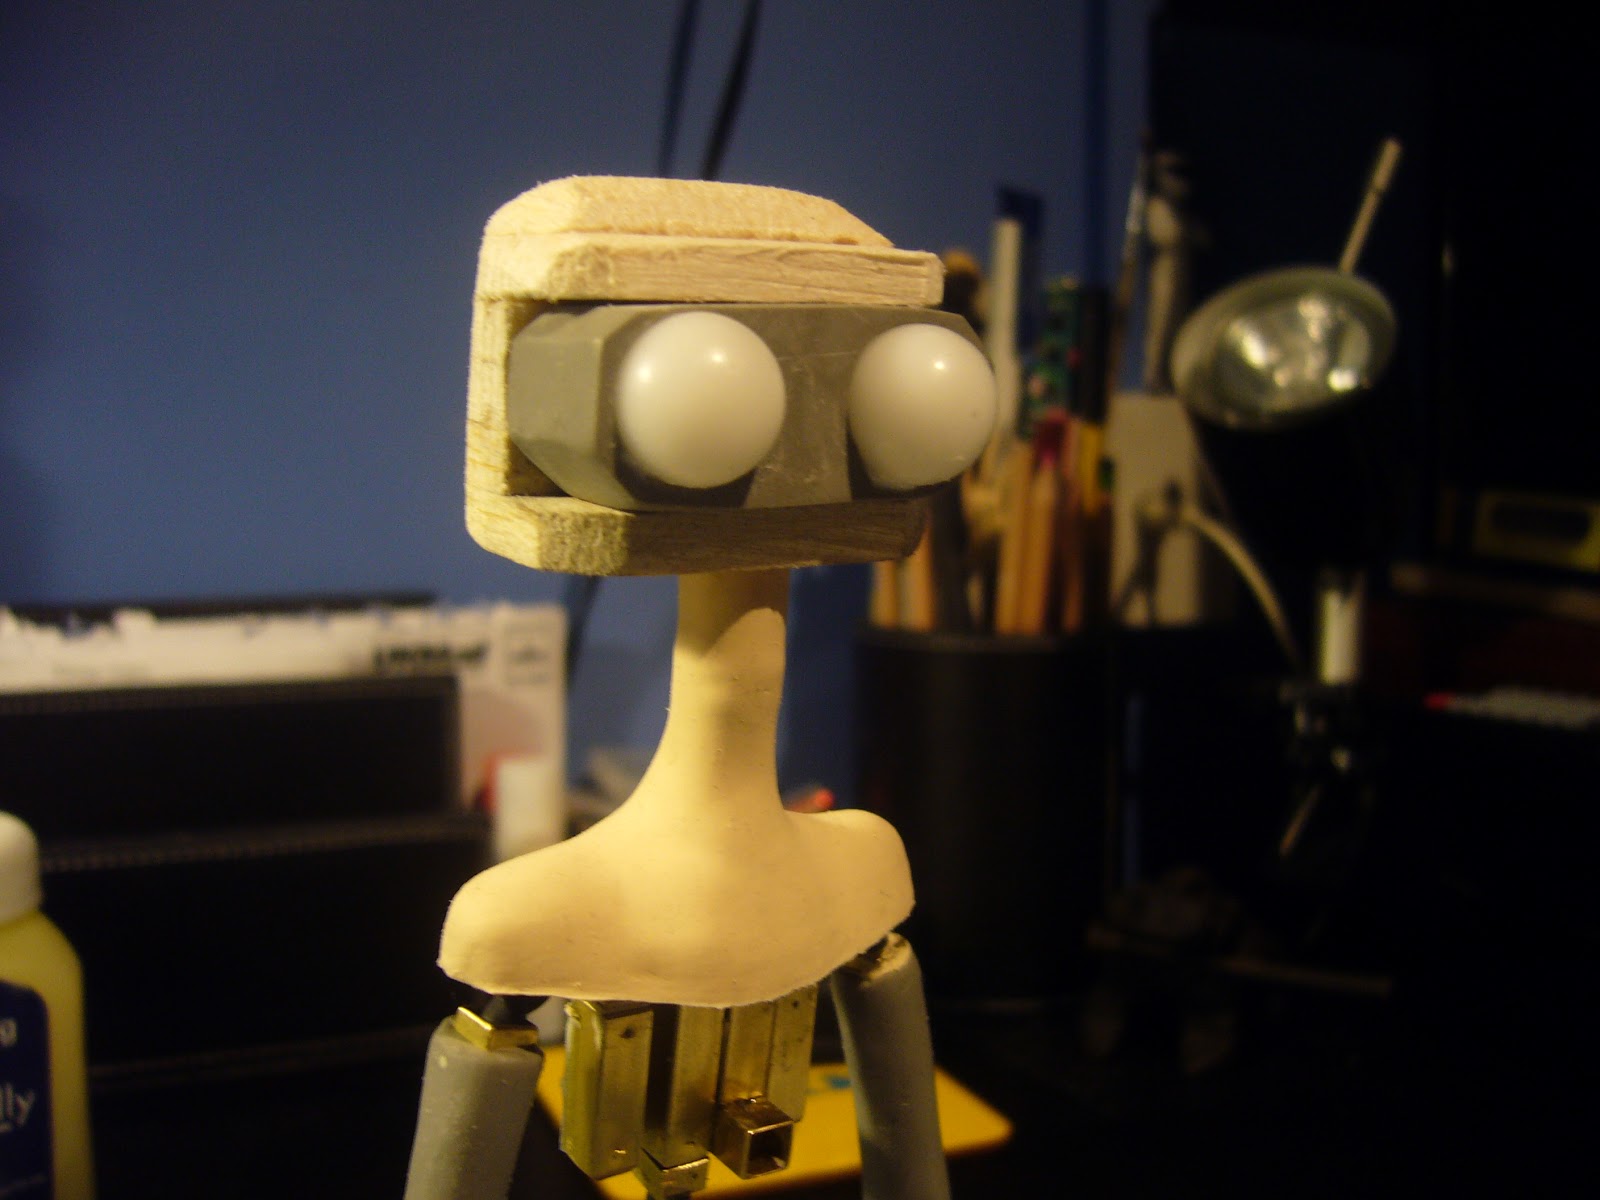
 Here's what the head looks like without the replaceable faces. minus an ear

It snapped off

I cried


Jokes


 Replaceable faces, Top and Bottom!


TADAH
That's enough for one post :)

Sunday 14 April 2013

I 'broke the mould' making this one... Lol jokes the mould is fine.

WHAT ARE YOU DOING LOOKING AT MY BLOG?!?

Nah its fine don't worry
Anyways when we left off I was babblin' on about armatures. so next, I thought I'd show you my miniature girl.

As I said before, there's a couple scenes that show a hill with a little girl on top. So to save me making another full armature with clothes and all that, I decided to make this hill scene in miniatures.  
So here I go:

Firstly I sculpted a design of the little girl on top of the miniature armatures made previously
She's shown below:


She's only being seen from the back 3/4s so the sculpt of her face wasn't too important, for this, i just need a readable silhouette of a girl, I think It works...


Next the claying up.
I rolled out a sheet of plaster scene with a rolling pin...


I then cut out her basic shape in the plasticene and plonked her in.


Carefully, I clayed her up so she was half submerged in the plasticise. This would give me the one part of the mould.

I added moulding keys also :)


I then boxed her in ready to pour plaster on her...


I then got prepped for making plaster. with a checklist of things I needed:

  • Clayed up and boxed in sculpt 
  • Cup of water  
  •  Cup of plaster (in this case, a Marmite lunchbox) 
  •  A whisk 
  •  A mat, to stop mess! 
  •  Extra plasticene in case of leakages 
  •  Bravery 
  •  Courage 
  •  Patience

I then made the plaster, poured it and then waited for it to set.
I unboxed the mould and removed the clay to find One part of my mould!
WOO!


I cleaned things up and then added more shapes around the sculpt so I could remove the two parts of the mould easily when using sticky silicone


I then boxed her in again, placed the K&S where I needed a hole for the swing and then poured some more plaster on top


And here are the two parts of my mould! waahooo!

I then filled the mould up with black silcone (as she'll be as a silhouette)


However, the final didn't come out as planned, and I've run out of silicone now, so I'll upload a pic when I've made a version i'm 'happy' with.


Over and out

Oooh! Where've you been?

HA! Where have I been?

Makin' stuff thats where!

Sorry for the lack of any posts my sixteen followers :( I get so into working, I forget I have to show it on the interweb now and again, so now it is my mission to tell you what's been happening!

Well, when we left off I was saying stuff about Green Screen Mirrors and Maquettes and stuff, so next, I went on to the armatures for my puppets :)

First off, I designed the Boy's armature...
Once this was all Digitally created, I got some K&S brass tubing and marked out what I needed for my armature!

Then I cut all this out, shown below...


To get a nice finish on the K&S I file the insides and outsides with a small file, This also helps with the longevity of the armature as filing away any rough edges will prevent the wire running through it wearing down or snapping.
This project I also used some wet and dry sandpaper to get that extra nice finish, It made the insides much smoother and hopefully it will help give me a couple more seconds of animating time.


Let the filing commence!
LOOK HOW HAPPY I AM


My character wears socks on his feet, and he has a little bobble on the end of his toe, so to make this animatable, I ran a some thin wire out of the 'toe' and sculpted a little miliput bobble on the tip.

I'll sculpt around this in clay next, to eventually make a silicone mould, which will be covered in the sock fabric (hopefully!) 


Close up of the hand armature, Here I cut out a strip of aluminium sheet with some metal scissors, and drilled a small hole in the wrist, I then ran some wire into this hole and hand twisted it to make the wrist bendable, using some more thin wire, I made some fingers and stuck it all together using epoxy glue.

These are the smallest hands I've ever made, so its a bit worrying when I coming to sculpting, but it'll be ok! 


TAH DAHHH!
finished armature with no padding or steel for the feet!


Now, I have a couple of scenes in my film with a hill outside in a window. here we see a little girl playing on a swing.
Now, to save on the work load, I've planned to make this girl at half the size of the full animating size.
so Here's her armature plan...

However, at this time, I had not really thought about how I would tackle this, all I knew is that she'd need a bit of K&S to attach her to her swing.


It took a couple of attempts, and I tried a whole bunch of different ways of making the armature, from using washers, solid miliput these hand armature things I found in the stop mo room. aluminium sheet just stuck to some wire...

But in the end I came up with my own solution...


My solution, was to get some tiny little pieces of K&S, and then drill these little tiny holes into the top with a dremel. 
Shown below...


I then twisted some thin wire to the size of my armature plan,  and inserted into the holes I drilled perviously, 


I then glued everything in position and then I was done!


My boy character is also being seen on the hill, so I have to make him at half size too!
So for the armature plan, I simply shrunk down the original full sized plan seen at the top of this post, and then edited it, so it fitted the purpose.


I did the same as I did with the girl armature for the boy, so I won't bore you anymore.


But anyways! thats some armature work done.
It took way longer than expected... so now on to everything else I have to do!